Showing posts with label DIY. Show all posts

Friday, August 16, 2013

The Great Jenkins Craft Week

CRAFT WEEK!!!
The invitation, courtesy of my sister-in-law Heidi, using the app abeautifulmess!
 

Recently the women in my extended family did a craft week, and it was so much fun!!  Several things go into planning such a big event and so we started planning about 4 months in advance.
In pulling off such a large undertaking, there are several areas that have to be discussed and agreed upon in order to pull it off, and I thought it would be fun to list it all, so you can benefit from our trials and successes!

  1. Teacher vs. Student - its important to first establish if you will be having an expert come in to teach a craft/skill or if someone in your group of attendees will be the teacher.
    • We decided that each one of us (there were 4 ladies) would be a teacher for one day and a student for the other days.
  2. What will be taught? - next would be to decide what you want to learn about or in our case what we wanted to teach. Here is an example of how we broke it out.
      • Day 1 - Screen Printing
      • Day 2 - Card Making
      • Day 3 - Gingerbread (Christmas in July) Project
      • Day 4 - Metal Stamping
    • Each one of us decided that we wanted to do something that we have never done before on the day we were teaching, so this also required us to learn the skill prior to our class (that was fun!!)
  3. Gather your supplies - in our case, each one of us took responsibility for the day that we were teaching, including all supplies that went into the craft.  If that doesn't work for you, you could provide a "class list" for each day, of items that each person would need to bring with them.  But be forewarned, if you choose to have people bring items, you run the risk of either having your attendance low because its a hassle, or the wrong item is brought to class.  Either way you do it, just make sure you get the buy in from the group so that all goes well. If money is an issue, you could also get your list of costs of supplies and then collect a craft fee from everyone.
  4. Plan the dates - its important for a good turnout for your craft week to make sure that the dates and times work for everyone! And trust me, this was the one and only challenging thing that we came across when planning ours! In our case, because we have some out of towners and ladies with children, we planned our dates first, so that travel and childcare and such could be considered.
    • We ended up making our event an entire week, starting with Monday and ending on Friday, but we took Wednesday off.
  5. Location, location, location - this is an important one! If you are a crafter, you know that crafting requires space, so when planning your craft week, figuring out where you will host it and set it up is crucial! For us, we decided that if it was our day to teach, then we would also have it at our house, except for the out of towners of course, but we worked that out by letting the out-of-towner use our house to teach when necessary.
  6. Snacks and Drinks - very important!! Crafting takes energy and snacks are always welcome, and all that talking and laughing makes a girl quite parched! Its important to establish the who, what and when on the snacks and drinks.  For us, whoever was hosting was also providing drinks and snacks and that worked out great! But you could also have people bring them!
  7. Be Flexible - with every good plan, there is always something that happens that throws a wrench in things, and you need to relax and be flexible and remember that this is for fun and to learn new skills. 
  8. Get Busy and have FUN!! - get to learning and crafting!!

And finally, here are some pictures from our craft week..........
 
 Day 1 - Heidi taught screen printing


 Day 2 - Lindsay taught us Card Making using scrapbooking materials


Day 3 - Mom taught us to design/decorate wall art Gingerbread houses


Day 4 - I taught Metal Stamping and Epoxy


Bottom line................GO FOR IT! Planning and doing a craft week was work, I'm not going to lie, but we shared the responsibilities and shared in the fun!!!


till next time.............Penny :)


Wednesday, August 14, 2013

Jackpot!

I finally completed the idea/to do board! It is not what I originally envisioned, but that is sometimes what happens when created juices start flowing.


I got tired of waiting and searching for the perfect background, and I kept asking myself, should I do metal, should I do cork, should I do both? And then it came to me........how about twine with little clothes pins! JACKPOT!! 
I love how it turned out and it really it accents the wall color so well!
 
till next time................Penny


Tuesday, August 6, 2013

Embroidery Hoop DIY(ish)

Maybe you noticed, but we love our embroidery hoops around these parts! They are an inexpensive item, that can be used in a multitude of ways. I am always looking for new ways to use a hoop to create a custom piece of art for my home.

Today I am going to do a little DIY (and I use that term VERY loosely) to make a simple stitched embroidery hoop. You need minimal materials which makes for a cheap project! The thing you need most is time and patience.

To start you will need:

1. embroidery hoop, any size
2. embroidery floss, color of your choice, if you don't have any invest in black or a charcoal gray, very multi use.
3. scraps of fabric to embellish
4. needle

Let's begin (please keep in mind this is my first attempt at a DIY, I am kind of an off-the-cuff crafter who just makes things as I go along. Because of this I kinda forgot a few pictures. Let's pretend the pictures I do have are amazing, and the ones I forgot you don't need!)

The very first thing I did was create my picture using word (or some such program) and print it out. I forgot to get a picture of my "template" but you can see it here taped underneath my material. Once you have your picture created and all set,  you will be tracing the words you want to embroider onto your main fabric. This becomes a guide for your stitches. I love to use muslin as a background fabric because it's see through! I can trace my words very easily.

Make sure to tape the pattern and the fabric so it doesn't shift when you copy the words!
 I use a heavy duty heat and bond to adhere my pictures since it's just going on the wall and doesn't need to be stitched down. The possibilities are endless here!
Here are my words traced in pencil and I added my embellishments.
 Here is where you imagine a picture of a half stitched picture! I do a simple embroidery back stitch to make my words. Just up and down in neat stitches along your pattern. There are many tutorials online, so I won't bore you with those details here.

Now for some finishing touches, I used to leave the hoops naked, but a crafty lady I adore wrapped her hoops in fabric and I've been doing it ever since. I think it adds a special touch, and makes the final piece look that much more complete. Just tear or cut strips of fabric hot glue one end under the beginning clasp of the outer hoop and wrap. It's that simple! I don't hot glue the whole thing, just the beginning and end of each piece. Saves time, and your fingers.

just keep wrapping!

I tore these strips because I wanted the shabby look of the frayed edges for this one. You could just as well cut them and you have a nice and neat fabric layer on your frame.
 Here's the back! When you are done with your picture, and the frame is wrapped it's time to get it in there nice and snug. Tighten the hoop as much as you can, gently pulling the fabric taught. Trim the excess material, leaving just enough to fold over and glue down. Using a small bead of hot glue fold over the excess material and glue it to the inside hoop. This will keep your picture in place.

I love to hide all my mistakes with a nice circle of felt.Cut a square bigger than your hoop. Put a small line of glue on one section of your hoop, and lay it on the felt. Working slowly and carefully finish gluing down the felt. When the glue has dried trim off the excess, trying to be sure that no felt shows in the front. 
I like to add my label too. :)

 And voila! A sweet finished product made just the way you want!

 If this is super confusing, or I missed a major step please comment with any questions! I am happy to help. I hope you will try your hand at making a special hoop, these make great gifts, and I think they look pretty sweet hanging up in almost any room of the house!

Sunday, July 21, 2013

DIY - Making a Chevron Template

I've always wanted to make a chevron background for my button art, but quite frankly it intimidates me.  Plus, the added time of making the grid, then erasing the lines, or using oodles of tape every time makes me frustrated just thinking about it.  But one night, not too long ago, I decided to tackle it.  I came up with a solution to help me save time and I hope that it can save you time as well.  Since I use the same size canvas,  I figured I could just make a template to follow, saving me time!   This template will be best used for those that will be using it more than once.  It's definitely great for one time uses, but won't necessarily save you time.  :)

 I completely forgot to take a picture of the original grid, but basically you take any cardboard you have lying around and measure out the size of the area you are covering.  I am using a 9x12 canvas so I drew a 9x12 rectangle on the cardboard.  Then I decided how far apart I wanted my "peaks" to be and how far apart I wanted each zig zag to be.  You might have to use a little bit of math to figure it out.  I got lucky with 9 and 12 both being divisible(never thought I would ever use that word again) by 3 and made each peak to be about 3" apart, making the whole process look even.  Then each zig zag was about 1.5" apart.  Basically, each square was 1.5" by 1.5".  So once you have figured out all that mess, you make your grid.  Drawing all your lines horizontal and then vertical.  Then, you add your diagonal lines.  You can see the basis of the grid below. 


Now here's the fun part!  As you can see in the picture above, I also added in a few lines on the part of the zig zag that I was not going to need.  I wanted my template to stay in tact as one piece.  Now you can start cutting out the parts you don't need.  On the inside pieces, it's easier to use an exacto knife instead of a pair of scissors.  The more cardboard you begin losing, the flimsier it gets and you want it to keep it's strength.
Below is the finished product!  It probably took me about an hour to make but it's so worth it!  All I did was line it up on my canvas and traced the lines!  Bam it's done!  Just add paint!  

Here's the finished product!  And next time it will be super duper easy to add my chevron to any canvas!


I hope this tutorial helped you make your chevron projects a little easier!  Please let me know if you found ways to improve your template!  As always, share with us on our Facebook Page all that you have created! 

Happy Chevroning! Shellie 

Wednesday, June 19, 2013

Zippers and I, Back Together Again

So zippers and I broke up for about a week.  It would have been longer but a sweet customer of ours wanted a custom order pencil case.  I begrudgingly said I would make it.  I didn't like the idea that we would have to make up.  They had been so mean to me. Mocking me at every turn, but we had a good long chat and decided to make it work.

For the pencil case I wanted to use laminate fabric, which has become my new obsession!  Who wants a bag lined with normal fabric that gets gross and dirty!   Never making a bag before I used this tutorial to get me started.  However, I somehow didn't follow the directions all that well and my bag turned out like this:

This wouldn't be so bad if it were supposed to be the size of a make up bag and the zipper was actually going the correct way.  Don't get me wrong, it's super cute but not what it needed to be.  Let's call it a happy accident and now it's in the shop.  :)

So here goes round two.  I found a new tutorial that helped build upon my knowledge of the original zipper bags and the first boxie tutorial I used.  I now know what I should and shouldn't do.  How I can make it my own and the best way for me to not only sew with zippers but to sew boxy pouches.

Here you can see the true difference in size.   Oopsies.  :)  I am grateful that I was made to have this opportunity to learn and grow and become one with zippers again.

Thursday, February 2, 2012

DIY - More fun with frames!

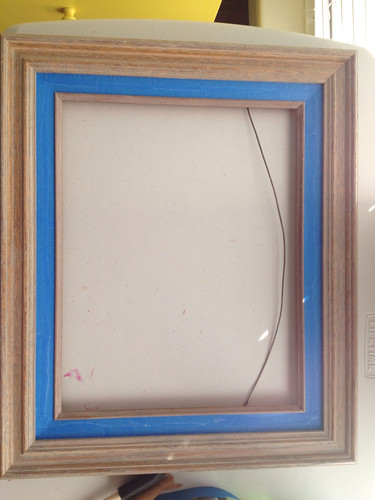
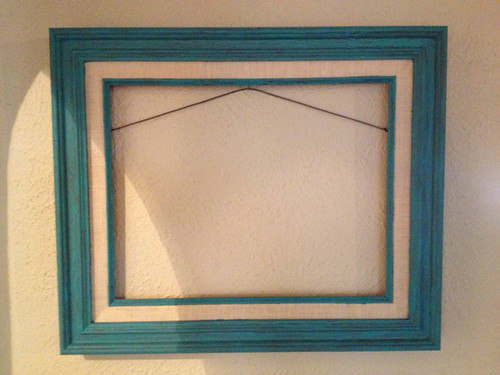
I found this ugly interesting frame at an estate sale and immediately saw some good potential for the fabric border. I loved the almost burlap quality to the small rim of fabric between the two wooden frames. I knew it had to come home with me, destined for a little makeover!
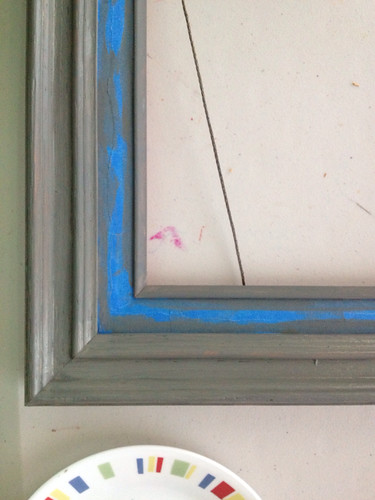
To begin redoing the frame I carefully taped over all the fabric. Of course my tape was too wide, so I had to tear the tape in half lengthwise. Talk about making more work for yourself! My vision was to attempt the Elmer's glue crackle method floating around the Internet. First order of business is painting the base coat that you want to be showing in the "crackles". I am lazy so I chose not to sand the frame beforehand. Though this didn't save me any time because I had to paint 3 coats of gray to hide the weird mottled pink of the original frame! My tip is to lightly sand your frame if it is shiny. This will help the paint adhere and make the process much smoother!


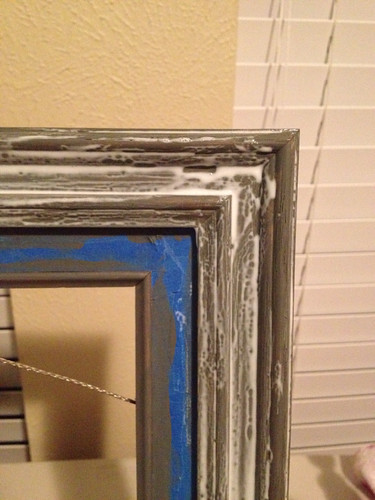
As soon as I got my base color as solid as I wanted I applied a liberal layer of Elmer's glue. Contrary to all the tutorials I read, I learned that letting it dry for 5 minutes is not enough! Let it dry till it gets a skin, and there are still wet patches of white left. Those white patches are what will become the crackled spots on your finished product!

 When the glue has set, carefully paint over it (in smooth strokes) your desired top color. Let the paint dry, and walk away. I kept looking at it and waiting for it to look crackly, my advice? Leave it alone and come back in a  few hours! That way you will be pleasantly surprised at what you find! Depending on the size of your frame you can do these last few steps a section at a time on your frame. This was my first time so I am definitely gonna have to do it again to correct the mistakes I made the first go around!

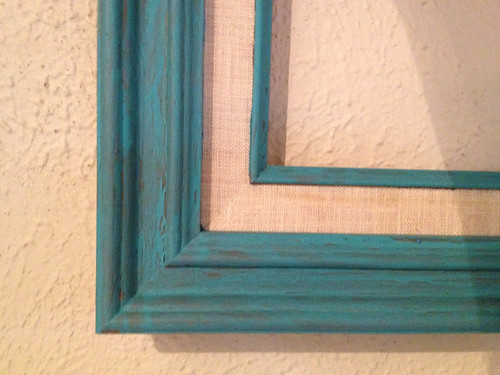
Sorry for the terrible picture quality! I did this project at night. It has definitely helped me see that even the craziest of frames can be modernized and altered to fit your decor. I love the look of this and definitely want to give it another shot! This frame is headed to a friends house, where the bold aqua fits her house to a T. Play with the colors and have fun, see what you can create!

Friday, January 27, 2012

DIY - Lamp: A Right Bright Deal - Updated

I purchased this amazing lamp and lamp shade for $3!  What a steal of a deal, right!?!

I knew I couldn't pass this up so I bought it not knowing what I might use it for.  My sister, closest in age to myself, is redoing her room and I knew exactly what needed to be added to her decor!  With a few scraps of fabric left over from making curtains, I added some pizzaz to the lamp shade.

First, lay the lamp shade on the fabric and cut out around it leaving about 1/4" allowance.
 Next lay the fabric onto the lamp shade.  To make it easier, I did sides 1 and 3 first.  You will see why later.
 And then, using hot glue, glue the fabric to the top and bottom of the lamp shade.
 Pull the corners tight and glue into place.
 Then lightly glue the sides down.  No need to use a lot of glue, just enough to tack it down.  There is no need to hide the unfinished sides because sign 2 and 4 will hide them.
Now take sides 2 and 4 and tack down the top and bottom.   Do not glue the entire top and bottom.  First you want to fold under the extra allowance on the side, tack it in the middle and then glue the rest from top to bottom.  You will be gluing onto the unfinished sides of 1 and 3.  Once you have done that on both side, then finish glueing the top and bottom.  Don't forget about the corners.  This will make the edges look finished.
 And viola!  A finished lamp shade!
With the base, I picked a bright pink spray paint, that I already happened to have, to match the theme of her room.  Make sure and cover up all of the areas that you do not want to be painted.

Then go to town and spray away!  If you have a lamp that requires a finial, spray the finial to match the base color to tie it all in.

And there you have it!  A new lamp for $4!