It's been awhile since we've posted! Having little ones, buying a house, and the usual has kept us away but we are back and better than ever! We will begin posting all of our fun projects that we've worked on the past few months, along with current ones we just finished! Sit back and I hope you enjoy the ride!

Tuesday, June 19, 2012
Thursday, February 2, 2012
DIY - More fun with frames!
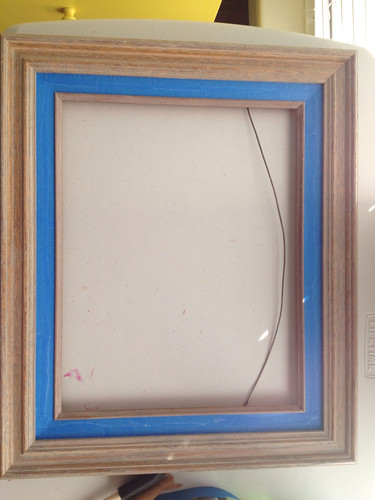
I found this ugly interesting frame at an estate sale and immediately saw some good potential for the fabric border. I loved the almost burlap quality to the small rim of fabric between the two wooden frames. I knew it had to come home with me, destined for a little makeover!

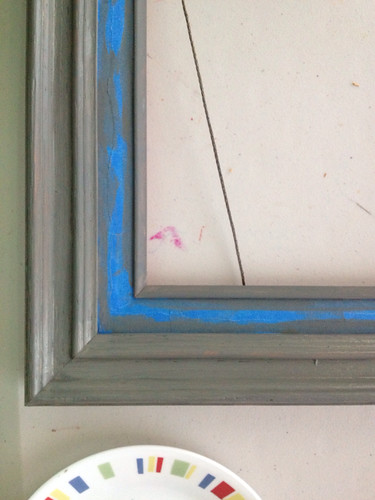
To begin redoing the frame I carefully taped over all the fabric. Of course my tape was too wide, so I had to tear the tape in half lengthwise. Talk about making more work for yourself! My vision was to attempt the Elmer's glue crackle method floating around the Internet. First order of business is painting the base coat that you want to be showing in the "crackles". I am lazy so I chose not to sand the frame beforehand. Though this didn't save me any time because I had to paint 3 coats of gray to hide the weird mottled pink of the original frame! My tip is to lightly sand your frame if it is shiny. This will help the paint adhere and make the process much smoother!
As soon as I got my base color as solid as I wanted I applied a liberal layer of Elmer's glue. Contrary to all the tutorials I read, I learned that letting it dry for 5 minutes is not enough! Let it dry till it gets a skin, and there are still wet patches of white left. Those white patches are what will become the crackled spots on your finished product!
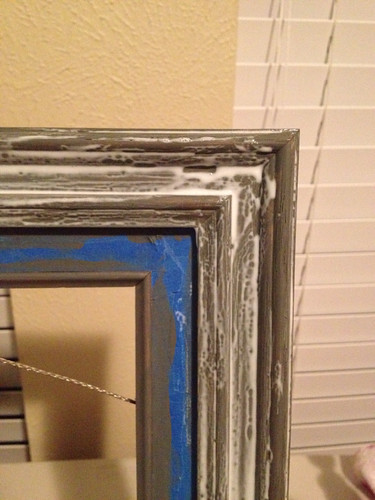
When the glue has set, carefully paint over it (in smooth strokes) your desired top color. Let the paint dry, and walk away. I kept looking at it and waiting for it to look crackly, my advice? Leave it alone and come back in a few hours! That way you will be pleasantly surprised at what you find! Depending on the size of your frame you can do these last few steps a section at a time on your frame. This was my first time so I am definitely gonna have to do it again to correct the mistakes I made the first go around!
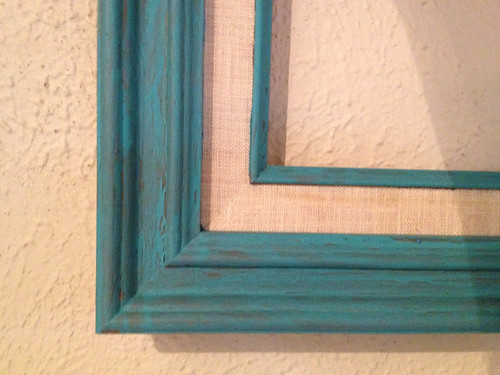
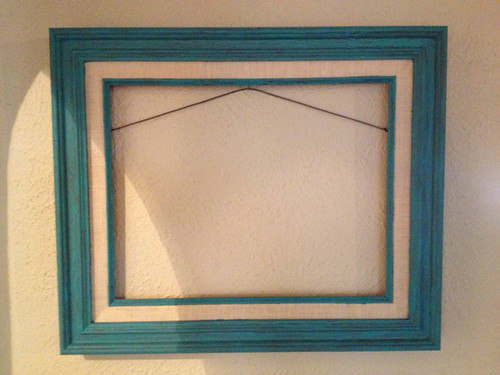
Sorry for the terrible picture quality! I did this project at night. It has definitely helped me see that even the craziest of frames can be modernized and altered to fit your decor. I love the look of this and definitely want to give it another shot! This frame is headed to a friends house, where the bold aqua fits her house to a T. Play with the colors and have fun, see what you can create!
Friday, January 27, 2012
DIY - Lamp: A Right Bright Deal - Updated
I purchased this amazing lamp and lamp shade for $3! What a steal of a deal, right!?!

I knew I couldn't pass this up so I bought it not knowing what I might use it for. My sister, closest in age to myself, is redoing her room and I knew exactly what needed to be added to her decor! With a few scraps of fabric left over from making curtains, I added some pizzaz to the lamp shade.
First, lay the lamp shade on the fabric and cut out around it leaving about 1/4" allowance.

Next lay the fabric onto the lamp shade. To make it easier, I did sides 1 and 3 first. You will see why later.

And then, using hot glue, glue the fabric to the top and bottom of the lamp shade.

Pull the corners tight and glue into place.

Then lightly glue the sides down. No need to use a lot of glue, just enough to tack it down. There is no need to hide the unfinished sides because sign 2 and 4 will hide them.

Now take sides 2 and 4 and tack down the top and bottom. Do not glue the entire top and bottom. First you want to fold under the extra allowance on the side, tack it in the middle and then glue the rest from top to bottom. You will be gluing onto the unfinished sides of 1 and 3. Once you have done that on both side, then finish glueing the top and bottom. Don't forget about the corners. This will make the edges look finished.

And viola! A finished lamp shade!

With the base, I picked a bright pink spray paint, that I already happened to have, to match the theme of her room. Make sure and cover up all of the areas that you do not want to be painted.
Then go to town and spray away! If you have a lamp that requires a finial, spray the finial to match the base color to tie it all in.

And there you have it! A new lamp for $4!
DIY - Repainted and Reupholstered Chair
I found this chair at a local estate sale. Saturdays are usually half price days and this was no exception. We were about to check out when I saw this chair tucked under a desk. I saw the potential it had. I couldn't figured out exactly what I wanted to do with it until one day I was cleaning up my fabric stash and found the perfect fabric! You know the excitement you get when you can see the amazing picture in your head of what it could look like. I was all giddy inside!

First, I unscrewed the cushion from the chair and got to work taking out all of the staples. Make sure and put the screws in a safe place. Keep the finished covering on the bottom. We will use it later.

To make this job easier, I used a screwdriver to get under the staples and would pull them out with pliers.

Next, take the cushion, scissors, and the fabric and lay out the fabric.

Place the cushion on top of the fabric and cut around it. Pull the fabric up the side of the cushion so that you can figure out how much allowance to leave. It's always better to have to much than not enough.


Once it's all cut out, if your fabric is anything like mine, you will need to iron it. You are probably thinking that you can skip this part....ironing stinks....blah, blah, blah. Trust me. It will look ten times better if you iron it.

Now that your fabric is all ironed, lay it out onto the floor and place your cushion on top. Since I am in my garage, I laid out a sheet first so that my fabric wouldn't get dirty. And p.s. I hope you like my beautiful blue toes, because you will get to see them a lot.

To get started staple the front and back. Pull just a tad. You don't want the fabric to be too tight or too lose.

Now comes the corner. Staple the end...

And where there is an inside corner pull the fabric up into the corner and staple. Flip it over several times to be sure you like the way the inside corner looks.


Once the inside corner is pulled and stapled the way you like it, slightly pleat the outside corner and staple. I only used two pleats.

Now it's time to finish stapling around the rest of the cushion. Slightly pull and staple. Remember not too tight, not too lose.

Around the back of the cushion, where it curves, you will need to pleat the fabric slightly. Then go to town stapling around the edges.

Once you are done stapling cut the extra fabric and staple some more if you see fit.

Remember that piece I told you to keep, well now you can reuse it and staple it back down. I just followed the old staple marks and only stapled in those spots.

And now you have a beautiful new recovered cushion!

To redo the chair, I lightly sanded it down with my new palm sander I got for Christmas.

I really wanted to do this project right so I used a primer from the local hardware store. I actually like the color but I still need to paint it a lovely glossy black.


I let the primer completely dry overnight and started painting the chair the next morning. It took two coats to paint the chair. Gloss spray paint needs to be applied in light coats. If you spray to much on, it will run so keep it light. If it does happen to run, use a paper towel and lightly wipe the run in the direction of the wood grain. Then, when you go to apply your second coat it will cover the paint that you lightly took away.

And after a few hours of drying time and screwing the cushion back on, I now have a finished chair!


This one is listed for sale. Check out our Facebook page to see pricing!
Monday, January 23, 2012
Ode to the Frame
One Saturday morning we spent garaging, we were not having the best of luck but we stumbled upon a sale. The items for sale weren't that exciting but I did find a bag of frames and you will never guess how much I got them for....$0! That's right, FREE! The backs and glass were missing so the lady just gave them away. I brought them home and used my spray paint magic on them! I can't wait to use them in the girls room!

Sunday, January 22, 2012
The High Chair
After I had spent the morning garaging with Shannon, I was on my way home when I saw a sign for a yard sale. Those types of signs always leave my heart with an exciting flutter in it. I went to put the car into park and saw this amazing vintage high chair. I expected to hear $20 but the words "five dollars" rolled out of her mouth. I instantly screamed "SOLD!" and drove away with my new find! I can't wait to paint it to match my new table!

Saturday, January 21, 2012
From Lame to Super Awesome Frame
We started out one Saturday morning at a garage sale for an elementary school. They had some amazing finds! I instantly found a vintage school desk and a hand crafted wooden frame. I still need to paint the desk but as soon as I saw the frame I instantly knew what it's destiny would become.


I picked out a beautiful aubergine spray paint and got to work. We had an extra piece of MDF, which the hubs cut to fit for the opening. It was then painted with chalkboard paint and nailed into place. It's perfect for my girls, especially knowing that chalk can be cleaned off almost everything! As you can see they have already gone to town.

Friday, January 20, 2012
Garaging of all Garaging
The first time I went garaging was with my best friend Shannon. It was amazing! The possibilities are endless and I can honestly say that in heaven there will be a garage sale everyday!
Here are a few items we found that day and a few over the next month:
2 yards of black with white polka dotted fabric for $1!

3 wreaths and pink yarn for only .10 cents a piece! What a steal! And Buttons! I love buttons and this lot we got for about $4!


I am absolutely in love with children's books, especially vintage ones. These were .50 cents a book.

An apothecary jar and light blue bud vase for $1 each.

My two oldest daughters fight over the small camping chair we have. So for $2 I found another one they can still fight over.

One can always use a mail/paper holder. This one was made by Home Interiors and I got it for just $5.

Love me some mason jars. These were a special given out by Jack in the Box as a cup. $1 for both.

One of my most amazing finds was this vintage Kodak Duoflex II Camera. I got the camera and the old fruit crate for $15. The guy I got it from drove a hard bargain but I stuck to my guns.


I love halloween and am always looking for items to use. I bought the Jack O'Lantern for $1 and the lady through in the pumpkin candle holders.

Always remember that to get a better bargain, you want to bundle. Bundling can lead to mega savings!
Subscribe to:
Posts (Atom)