Showing posts with label home. Show all posts

Monday, August 19, 2013

made it monday

Lots of fun items headed to our shop this week. Some weeks we get in the groove and can really crank out fun items, some weeks are more slow. You will see this week we were able to make a bunch of fun new holiday and seasonal items, as well as restocking some old favorites!
Adorable Halloween themed hoops! 4" skull hoops {$8}, 3" spider hoop {$6}

Autumn hoops! 8.5" Give thanks {$15}, 6.5" autumn wreath {$10}
Sweet Christmas hoops, 4' ornament hoop {$8}, 12" Merry Christmas {$20}
12" Happy Halloween {$20}
4" hand embroidered, Oh, Dear! {$17}
snap closure, chenille backed, star bib {$8}

chevron and floral burp set {$12} LOVE this color combo!
Sweet silhouette extra large swaddle blankie. This one has a small stain from a crafting mishap with paint so it is discounted! {$22}

Stain is hardly noticeable unless you are looking for it! It doesn't detract from the cuteness of the blanket in the slightest, but you get a steal of a deal!


Sunday, August 18, 2013

Got Paper?

I have a love for paper. Let's be real, I love anything I can craft with but I do love paper! However, I'm never really sure what to do with it. Going to the craft store you can find these beautiful packs of paper that all correspond together. The vibrant colors or embossed paper (sigh), the possibilities are endless! This being said, I have a ton of paper that sometimes goes unnoticed.  In the last year, I found this great idea that came from a friend of mine. You take decorative cardstock paper, cut it into strips and put it on twine.  I love playing with the ends and either using scissors to create an inverted triangle or even using one of those decorative trim punches.

In realizing that my paper stack was seriously becoming large, I decided to pass the fun onto all of you. Each paper banner is made with thick cardstock in many decorative varieties such as girl or boy theme, halloween or fall and I even made one for your barbecue!  It's something so simple but can add some fun flair to your decor.  


Here's some fun examples of the halloween, fall, and Christmas banners.  Each of these were strung on brown twine and are approximately 3 feet long. 


The top row can be used for your kitchen or a little boys room.  I love the top right, it's made with multi-colored chevron and airplane paper.  The middle is perfect for your kitchen, party or even your living room.  This one is the longest at 5 feet long.  The last 2 will be perfect for your little girls room!  All of these are strung on different colored bakers twine.


This is one of the Shorties.  The Shorties are about 2 ft long and feature many of the versions of paper as the larger banners.

I was busy this week making over 30 paper banners!  They were super fun to make and range in price from $3 to $6.50, depending on length.  I hope yall enjoy them as much as I do!
~Shellie

Wednesday, August 14, 2013

Jackpot!

I finally completed the idea/to do board! It is not what I originally envisioned, but that is sometimes what happens when created juices start flowing.


I got tired of waiting and searching for the perfect background, and I kept asking myself, should I do metal, should I do cork, should I do both? And then it came to me........how about twine with little clothes pins! JACKPOT!! 
I love how it turned out and it really it accents the wall color so well!
 
till next time................Penny


Tuesday, July 30, 2013

Studio Tour {MamaBowers}

 When we were house hunting for our first home my list of wants was much larger than my list of needs. It's fun to dream of places and spaces that you can finally call your own. The first time I laid eyes on the interior of our house I knew it was "the one".
My favorite piece of furniture holds my tiny ironing board, and a few old suitcases filled with vintage sheets.
 With three living areas, one of those being a formal dining and living room, I knew it had plenty of space for our family to spread out and grow. And because we aren't really formal living or dining room people that space became the family craft space.

I adore hoop art. Each of these has a special memory or meaning, and that makes all the difference.
 We filled one half with books, cozy places to read, and plenty of crafting supplies for the kids, the other half became all mine. And it was a dream come true.
An inexpensive dresser from IKEA holds a multitude of supplies.
 I have had a lot of fun over the last 2 years turning this room into a place where I can feel inspired and where I truly love to be any chance I find the time. I love to collect things, but over the course of my life I've realized that if I have to stare at little collections everyday the clutteriness of it will drive me crazy!
This yellow dresser was listed on an estate sale website, a 40 minute drive later and she was mine. Totally worth it, she holds almost all of my fabric, though it's normally spilling out the front!
 So to keep me sane, and the rest of my house looking relatively neat, I keep all my collections on display in my room. It makes for a very happy and colorful space.
Quite possibly my most favorite corner in our whole house.
 I love being able to look around and see things given to me or made by friends, and I love to see things that I've made. It helps remind me on days when I'm feeling blocked that I do have the potential to make things, even if I feel like I will never touch my sewing machine again!
A thrifted crewel piece, a re-purposed frame, and the "map" for my Mom's queen sized quilt (my latest BIG project).
Every item has a story and a memory attached. Those are the best kinds of things. I'm definitely a sentimental person. I think that comes from moving around a lot as a child. I hold on to memories as best I can. (and it's very rarely this clean, I am a seriously messy crafter, but when it is I just want to dig in a mess it all up!)
$30 dresser took a lot of love, time (and paint), but in the end it was SO worth it. I will never tire of this piece, or of my B collection!
 All those years of having only a corner of the closet to keep my supplies, and having to lug it all out to the kitchen table to use it, only to have to clean it up before the next meal, has allowed me to be very grateful for this space I now call my own.
Using an old wooden toolbox as a catch-all makes the clutter not seem so bad. Always a few frames waiting to be painted hanging around!
I hope you are able to find a corner of your own home to call your own and create away. Even if it is just a few drawers in the closet and the kitchen table, creating is so good for the soul!


Monday, July 22, 2013

{made it monday}

So we are going to start a new little feature here on the blog! Every Monday I will share some of our new products we've made during the week, and also spotlight some old favorites! Having a shop that is ready to buy rather than made to order means that we are making things, and making things often! Some days I feel like I hardly come out of my crafting space, but that provides me other days where I can rest easy knowing I've worked hard! How do you find a balance between getting your craft on as much as you want/need and spending your other "free" time doing other unpleasant things like cleaning and stuff? I'd love ideas!

Here are some of my favorite products headed to the shop this week. Every Monday new merchandise goes to our booth at Wishes and Dreams in Arlington, TX, which means Tuesday is the day to shop shop shop! And don't forget, we will ship almost anything we make, and we love to do custom orders (which reminds me, we should showcase some of our custom stuff....putting it on the list!).

I am absolutely in love with the fabric pairings on these new burp cloth sets. Made with 100% cotton prefold cloth diapers, these are super absorbent, and durable. Bound to last through many machine wash and dry cycles! Only $12 a set, and most will have a matching diaper and wipes cozy next week!

These whales are so sweet, and I always love the lime and bright blue combo for boys or girls!
 Adorable sock monkeys. I can't even handle it. I wish I had this fabric when my littlest was still in need of burp cloths! As it is, I think my purse needs a diaper cozy with this fabric!
 Pretty little owls paired with a dainty floral. Love these!
 Some fun new hanging towels in a variety of colors. I hate using any other kind of towel now! Drives me insane when I constantly have a pile of towels at the base of my stove or towels randomly shoved into the stove handle (you know what I'm talking about!) from multiple child uses. These eliminate that problem! Only $5 per towel, and they have a snap closure for durability.
 And last, but not least, these bright ruffled accent pillows. Each pillow measures approximately 12 x 16 and is perfect for a bed, couch, or chair! The flat ruffle means it will never fray or lose it's shape, and the case is made in the envelope style for easy removal. We love making things that will last, and the ability to wash the cases to keep them clean is a major plus! $20 each.
Hope you enjoyed this little peek at some of our new products. We have almost all of our things for sale listed on our facebook page, we'd love for you to follow us there! www.facebook.com/thegaragingmavens

Until next week!

xoxo
Shannon

Thursday, February 2, 2012

DIY - More fun with frames!

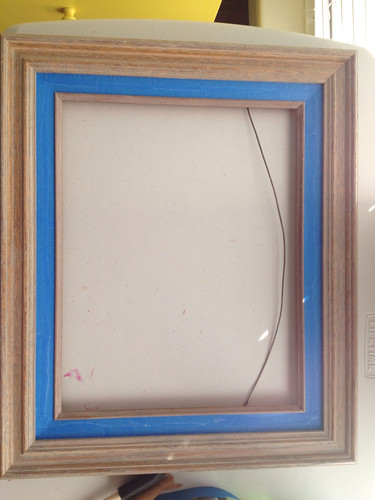
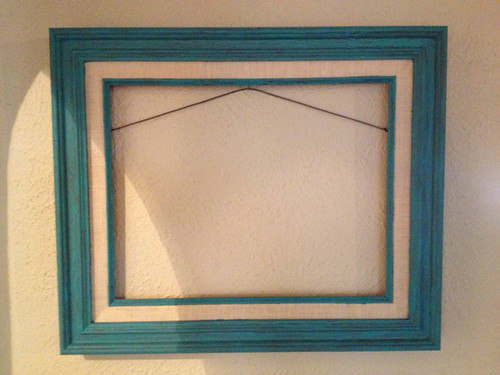
I found this ugly interesting frame at an estate sale and immediately saw some good potential for the fabric border. I loved the almost burlap quality to the small rim of fabric between the two wooden frames. I knew it had to come home with me, destined for a little makeover!
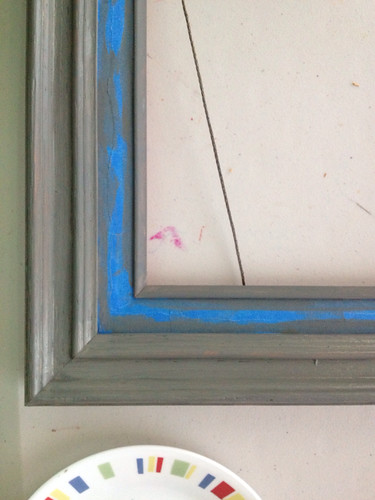
To begin redoing the frame I carefully taped over all the fabric. Of course my tape was too wide, so I had to tear the tape in half lengthwise. Talk about making more work for yourself! My vision was to attempt the Elmer's glue crackle method floating around the Internet. First order of business is painting the base coat that you want to be showing in the "crackles". I am lazy so I chose not to sand the frame beforehand. Though this didn't save me any time because I had to paint 3 coats of gray to hide the weird mottled pink of the original frame! My tip is to lightly sand your frame if it is shiny. This will help the paint adhere and make the process much smoother!


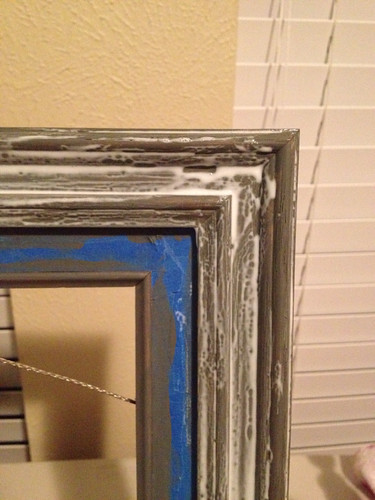
As soon as I got my base color as solid as I wanted I applied a liberal layer of Elmer's glue. Contrary to all the tutorials I read, I learned that letting it dry for 5 minutes is not enough! Let it dry till it gets a skin, and there are still wet patches of white left. Those white patches are what will become the crackled spots on your finished product!

 When the glue has set, carefully paint over it (in smooth strokes) your desired top color. Let the paint dry, and walk away. I kept looking at it and waiting for it to look crackly, my advice? Leave it alone and come back in a  few hours! That way you will be pleasantly surprised at what you find! Depending on the size of your frame you can do these last few steps a section at a time on your frame. This was my first time so I am definitely gonna have to do it again to correct the mistakes I made the first go around!

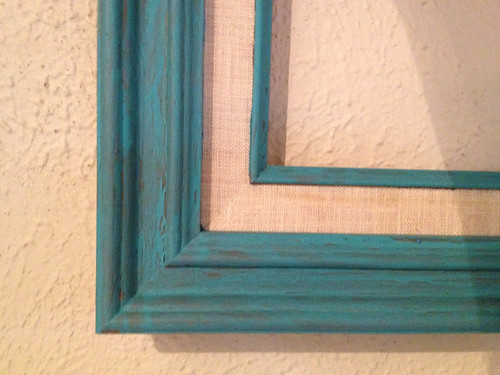
Sorry for the terrible picture quality! I did this project at night. It has definitely helped me see that even the craziest of frames can be modernized and altered to fit your decor. I love the look of this and definitely want to give it another shot! This frame is headed to a friends house, where the bold aqua fits her house to a T. Play with the colors and have fun, see what you can create!

Friday, January 27, 2012

DIY - Lamp: A Right Bright Deal - Updated

I purchased this amazing lamp and lamp shade for $3!  What a steal of a deal, right!?!

I knew I couldn't pass this up so I bought it not knowing what I might use it for.  My sister, closest in age to myself, is redoing her room and I knew exactly what needed to be added to her decor!  With a few scraps of fabric left over from making curtains, I added some pizzaz to the lamp shade.

First, lay the lamp shade on the fabric and cut out around it leaving about 1/4" allowance.
 Next lay the fabric onto the lamp shade.  To make it easier, I did sides 1 and 3 first.  You will see why later.
 And then, using hot glue, glue the fabric to the top and bottom of the lamp shade.
 Pull the corners tight and glue into place.
 Then lightly glue the sides down.  No need to use a lot of glue, just enough to tack it down.  There is no need to hide the unfinished sides because sign 2 and 4 will hide them.
Now take sides 2 and 4 and tack down the top and bottom.   Do not glue the entire top and bottom.  First you want to fold under the extra allowance on the side, tack it in the middle and then glue the rest from top to bottom.  You will be gluing onto the unfinished sides of 1 and 3.  Once you have done that on both side, then finish glueing the top and bottom.  Don't forget about the corners.  This will make the edges look finished.
 And viola!  A finished lamp shade!
With the base, I picked a bright pink spray paint, that I already happened to have, to match the theme of her room.  Make sure and cover up all of the areas that you do not want to be painted.

Then go to town and spray away!  If you have a lamp that requires a finial, spray the finial to match the base color to tie it all in.

And there you have it!  A new lamp for $4!

DIY - Repainted and Reupholstered Chair

I found this chair at a local estate sale.  Saturdays are usually half price days and this was no exception.  We were about to check out when I saw this chair tucked under a desk.  I saw the potential it had.  I couldn't figured out exactly what I wanted to do with it until one day I was cleaning up my fabric stash and found the perfect fabric!  You know the excitement you get when you can see the amazing picture in your head of what it could look like.  I was all giddy inside!

 First, I unscrewed the cushion from the chair and got to work taking out all of the staples.  Make sure and put the screws in a safe place.  Keep the finished covering on the bottom.  We will use it later.
 To make this job easier, I used a screwdriver to get under the staples and would pull them out with pliers.
 Next, take the cushion, scissors, and the fabric and lay out the fabric.
 Place the cushion on top of the fabric and cut around it.  Pull the fabric up the side of the cushion so that you can figure out how much allowance to leave.  It's always better to have to much than not enough.


Once it's all cut out, if your fabric is anything like mine, you will need to iron it.  You are probably thinking that you can skip this part....ironing stinks....blah, blah, blah.  Trust me.  It will look ten times better if you iron it.


 Now that your fabric is all ironed, lay it out onto the floor and place your cushion on top.  Since I am in my garage, I laid out a sheet first so that my fabric wouldn't get dirty.  And p.s. I hope you like my beautiful blue toes, because you will get to see them a lot.
 To get started staple the front and back.  Pull just a tad.  You don't want the fabric to be too tight or too lose.
 Now comes the corner.  Staple the end...
 And where there is an inside corner pull the fabric up into the corner and staple.  Flip it over several times to be sure you like the way the inside corner looks.


 Once the inside corner is pulled and stapled the way you like it, slightly pleat the outside corner and staple. I only used two pleats.
Now it's time to finish stapling around the rest of the cushion.  Slightly pull and staple.  Remember not too tight, not too lose.
 Around the back of the cushion, where it curves, you will need to pleat the fabric slightly.  Then go to town stapling around the edges.
 Once you are done stapling cut the extra fabric and staple some more if you see fit.

 Remember that piece I told you to keep, well now you can reuse it and staple it back down.  I just followed the old staple marks and only stapled in those spots.

And now you have a beautiful new recovered cushion!

To redo the chair, I lightly sanded it down with my new palm sander I got for Christmas.

I really wanted to do this project right so I used a primer from the local hardware store.  I actually like the color but I still need to paint it a lovely glossy black.

I let the primer completely dry overnight and started painting the chair the next morning.  It took two coats to paint the chair. Gloss spray paint needs to be applied in light coats.  If you spray to much on, it will run so keep it light.  If it does happen to run, use a paper towel and lightly wipe the run in the direction of the wood grain.  Then, when you go to apply your second coat it will cover the paint that you lightly took away.


And after a few hours of drying time and screwing the cushion back on, I now have a finished chair!

This one is listed for sale. Check out our Facebook page to see pricing!